For what? Troubleshooting, repair
 Explanation provided by John Doolittle, CAPT, USN (Ret) who graduated from the U.S. Air Force Academy and transferred to the U.S. Navy. During a 25-year career, he was deployed around the world as an officer in the Navy SEAL Teams; conducting special operations around the globe, to include Kosovo, Bosnia, Iraq and Afghanistan.
He retired as a Navy Captain after his last assignment as Director of the Preservation of the Force and Family Task Force at U.S. Special Operations Command Headquarters, supporting 73,000 Navy SEALs, Army Rangers, Green Berets, Night Stalkers, Air Force and Marine Special Operators.
Doolittle is a certified KAATSU Master Instructor, a NAUI Dive Instructor, and has an MS in Defense Analysis / Irregular Warfare / Special Operations from the Naval Postgraduate School.
He explains, "The KAATSU Cycle 2.0 works on a closed air system. Any leak, whether big or small, will interfere with it completing each 30 second Cycle.
Here is how you can check where the leak may be:
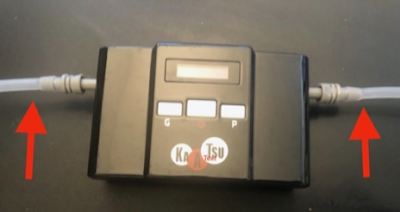
Step #1. Connect the translucent connector tubes into the sides of the KAATSU Cycle 2.0 device. Do NOT connect the KAATSU Air Bands. Set the device in Cycle mode and press P high. If the device does not complete the 8 steps of the Cycle, there is a pin hole in the connector tubes.
The most common spot for pin holds is where the connector tube meets the gray plastic connector. Crimping at that point over time can create a pin hole. See image #1.
The solution is to cut off 1/2-inch (1.2 cm) of the tube and reinsert it on the gray plastic connector. Use a little soapy water which will make it easier to slide the tube back on on the connector.
Conversely, if the device does successfully complete the 8 steps of the Cycle, proceed to Step #2.
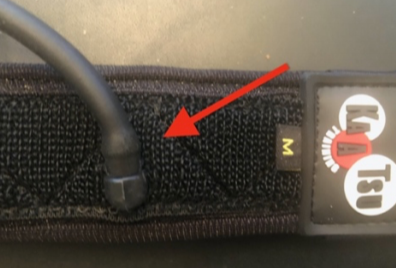
 Step #2. Since the connectors tubes are not compromised with a pin hole, the next step to check the black tube that connects to the KAATSU Air Bands. At higher pressures, the tube that meets the hard-black connection point on the KAATSU Air Bands may have a leak.
This usually only occurs after hard, frequent usage while pulling on the black tube. See image #2 on left. If the tube appears to be a little stretched, cut off a 1/4-inch (0.6 cm) and reinsert the tube with soapy water.
The black tube is designed so that it will pull off if pulled too hard. This protects the air bladder inside the KAATSU Air Bands from tearing which is a fatal to the bands. If this does not solve the problem, proceed to Step #3.

Step #3. The last issue to test is whether or not the KAATSU Air Bands or connector tubes are compromised.
To test this, only connect one KAATSU Air Band at one time, but leave the tubes inserted in both sides.
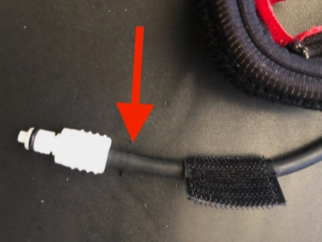
If the bladder inside the KAATSU Air Band has failed, the device will not complete 8 Steps, You will see bubbles along the seams of the band. You may also see bubbles coming out from the connection of the white connector and black tube. If this is the case, remove a 1/2-inch (1.2 cm) of the black tube and reinsert the connector. See image #3 on left.
If the bubbles are coming from the bladder, you will need a replacement band.
Copyright © 2014 - 2020 by KAATSU Global
No comments:
Post a Comment