For who? Competitive athletes
For what? Stamina, functional movement, mobility
While most people are attracted to BFR (Blood Flow Restriction) equipment due to its potential to develop muscle, KAATSU offers much more than a focus on muscle tone and muscle growth.
KAATSU presents a radically different paradigm for teenagers and young adults as well as for working parents, busy executives, and aging Baby Boomers. KAATSU enables anyone to exercise and rehabilitation anywhere anytime, including using KAATSU with jump ropes and all kinds of recreational equipment.
Whether you fold clothes or type emails, or jump rope, with KAATSU Air Bands on doing either the KAATSU Cycle or KAATSU Constant mode, you will get a great workout.
Copyright © 2014 - 2020 by KAATSU Global
Showing posts with label KAATSU Air Bands. Show all posts
Showing posts with label KAATSU Air Bands. Show all posts
Thursday, February 4, 2021
Tuesday, March 31, 2020
Dr. Cory On Jumping Rope With KAATSU - Arms
For who? Competitive athletes, work-at-home parents
For what? Rehabilitation, functional movement, strength, flexibility, mobility, KAATSU At Home
Cory Keirn DPT explains and showcases how the KAATSU Cycle 2.0 and the KAATSU Air Bands can be used for aerobic purposes.
"I don't have a jumping rope, but I got my KAATSU..."
"All that I am really doing is just pumping my calves..."
"...shift, shift...swivel, swivel, tap, tap...getting a little lateral movement in there...I got my arms pumping...stick with me..."
Copyright © 2014 - 2020 by KAATSU Global
Wednesday, November 20, 2019
8. Preparing to Use the KAATSU Cycle 2.0 - Checking Your Correct Leg Band Pressure
For who? Tactical athletes, physical therapists, KAATSU Specialists
For what? Recovery
The KAATSU Air Bands should be placed snugly on your upper legs. Snug - but not tight.
When you put on the KAATSU Air Bands on your legs, you should be able to place one finger between your skin and the KAATSU Air Bands. If you can place two or more fingers between your skin and the KAATSU Air Bands, the bands are too loose and you may want to slightly tighten the KAATSU Air Bands.
However, if you manually tighten the KAATSU Air Bands too much, you will not be able to place a finger between your skin and the KAATSU Air Bands. In this case, slightly loosen up the bands. KAATSU Air Bands are elastic Blood Flow Moderation bands with an inner air bladder; KAATSU Air Bands are neither a tourniquet or blood pressure cuff.
Occlusion training or blood flow restriction (BFR) training use tourniquets and blood pressure cuffs in order to restrict arterial flow (i.e., blood flow from the torso to the limbs). This is NOT what KAATSU Air Bands do, although KAATSU is the original BFR. KAATSU Air Bands were specifically designed and engineered to modify venous flow (i.e., blood flow from the limbs back to the torso). This is a major and very important difference.
In order to confirm that your pressure is safe and optimized and your bands are on adequately tightly enough, you can check your Capillary Refill Time (CRT). On your legs, press your thumb into your thigh (quadriceps) just above your knee (patella) if you are wearing shorts. If you are wearing leggings or long pants, press your thumb into your calf near your ankle. The skin will temporarily blanch (i.e., go white) and then will refill back up with blood and return to normal color.
The duration of time for the blood to refill and the blanched spot to return to color should be less than 3 seconds. If your skin does not turn back to its normal color within 3 seconds, the bands are on too tightly and should be loosened. When your leg turns a pink color (or rosy red or even a purple tone), this means that your capillaries are thoroughly engorged in blood, thereby improving your circulation.
Copyright © 2014 - 2019 by KAATSU Global>
Saturday, March 26, 2016
Spreading KAATSU In Germany With Robert Heiduk


KAATSU Specialist Robert Heiduk explains the mechanism and equipment of KAATSU using the KAATSU Master and KAATSU Air Bands in the German language in his latest introductory video:
Copyright © 2014 - 2016 by KAATSU Global
Friday, September 4, 2015
KAATSU Equipment Leasing and Financing

Instead of paying in full for KAATSU equipment, KAATSU Specialists and users can now pay monthly for their equipment and certification. KAATSU Global has formed an alliance with eLease to finance KAATSU equipment purchases for either 24 or 36 months.
The process is quite simple and requires only a one-page application and a copy of the first page of the borrower's last three month's bank statements. The complete process takes no more than 2-3 days.
These financing opportunities are ideal for individuals who cannot afford a one-time payment for the KAATSU Master Package, KAATSU Nano Package or KAATSU Cycle Package. Each package includes 4 KAATSU Air Bands (2 arms + 2 legs), a protective case, an extended warranty for 24 or 36 months, and all accessories.
Payments as shown below. These rates are subject to credit approval and credit worthiness and, as such, the rates may vary.
KAATSU Master Package (normally US$4,795): $249.13 (24 months) $188.94 (36 months)
KAATSU Nano Package (normally $2,850): US$146.53 (24 months) US$1110.52 (36 months)
KAATSU Cycle Package (normally US$1,875): US$109.64 (24 months) US$83.81 (36 months)
KAATSU Aqua Package (normally US$3,000): US$117.41 (24 months) US$76.72 (36 months)
Additionally eLease can finance multi-unit mixed assortment of equipment for large purchases. To figure the approximate monthly cost of a large purchase just multiply the 24- and 36-month lease rate factors times the U.S. dollar value of the order. These factors are 4.91% or 24 months and 3.56% for 36 months subject to the lender's credit criteria.
For more information, contact via telephone at toll-free +1-888-410-6350 or email info@kaatsu-usa.com.
Copyright © 2015 by KAATSU Global
Sunday, August 23, 2015
KAATSU 3-point Exercises For Arms


 KAATSU 3-point Exercises are a fundamental part of the standard KAATSU protocol for both the arms and legs.
 Dr. Yoshiaki Sato, the inventor of KAATSU in 1966, first established the KAATSU 3-point Exercises in the 1970s. These simple exercises have been performed safely and effectively among millions of individual KAATSU sessions among people of all ages and abilities with myriad physical conditions or ailments.
The KAATSU 3-point Exercises can either be used to help determine the optimal SKU pressure or as a form of basic exercise for both the arms and legs.
When the KAATSU 3-point Exercises are performed, they can be performed either on a KAATSU Master or a KAATSU Nano or a KAATSU Cycle unit. The 3-point Exercises can be performed while the user is either tethered (connected) or untethered (disconnected) to the units.
KAATSU Arm 3-point Exercises [illustrations on left]
The KAATSU 3-point Exercises for the arms involves hand clenches, bicep curls and tricep extensions. Each set of exercises should be done 3-4 times each with a maximum of 20 seconds rest between each set. Ideally, the number of repetitions for each exercise decreases before the user reaches muscular or technical failure* (or fatigues).
That is, an ideal set would be 25-30 repetitions on set #1, 10-15 repetitions on set #2, and 5-10 repetitions on set #3. Even if only 1-2 repetitions are completed on the last set, this failure signal sent to the central nervous system is one of the goals of KAATSU.
KAATSU Leg 3-point Exercises [illustrations posted here]
The standard KAATSU 3-point Exercises for the legs involves toe curls, toe raises, and heel raises. Alternatively, for more fit or active individuals, the 3 advanced exercises includes heel raises, leg curls and squats.
Each set of exercises should be done 3-4 times each with a maximum of 20 seconds rest between each set. Ideally, the number of repetitions for each exercise decreases before the user reaches muscular or technical failure (or fatigues).
That is, an ideal set would be 25-30 repetitions on set #1, 10-15 repetitions on set #2, and 5-10 repetitions on set #3. Even if only 1-2 repetitions are completed on the last set, this failure signal sent to the central nervous system is one of the goals of KAATSU.
* Technical failure is defined when the individual starts to do improper technique (movement) due to an increasing sense of fatigue. At this point, the set is stopped.
Copyright © 2014 - 2015 by KAATSU Global
Saturday, August 22, 2015
How Do You Find The Optimal KAATSU Pressure?

Identifying the appropriate KAATSU pressure (measured in SKU or Standard KAATSU Units) is a combination of the following:
*Level 1: Selecting the appropriate KAATSU Air Band size: small, medium or large
*Level 2: Selecting the appropriate Base SKU or manually tightening of the KAATSU Air Bands
*Level 3: Identifying the appropriate Optimal SKU or inflating the KAATSU Air Bands
LEVEL ONE:
The KAATSU Air Bands are available in 3 sizes: Small, Medium and Large.
The KAATSU Specialist should measure the circumference of the top of the arm (right under your armpit) and the circumference of the top of the leg (right alongside the groin). Those circumferences will determine the appropriate size for the KAATSU Air Bands.
ARMS
Small: 18 〜 28 cm (7.06 〜 11.02 inches)
Medium: 28 〜 38 cm (11.02 〜 14.96 inches)
Large: 38 〜 48 cm (14.96 〜 18.89 inches)
LEGS
Small: 40 〜 50 cm (15.74 〜 19.68 inches)
Medium: 50 〜 60 cm (19.68 〜 23.62 inches)
Large: 60 〜 70 cm (23.62 〜 27.55 inches)
If the KAATSU user exceeds 48 cm in circumference on their upper arms or 70 cm in circumference on their upper legs, then special order ("sumo size") KAATSU Air Bands are recommended.
LEVEL TWO:
After millions of KAATSU sessions in Japan, these are the basic guidelines for the Base SKU primarily based on age and general physical fitness. Of course, there are always individual exceptions, but these guidelines have proven safe and effective over the decades and among hundreds of thousands of users of all ages, abilities and physical abilities:
The Base SKU is the pressure after manually tightening the KAATSU Air Bands on the upper arms or upper legs. The pressure in SKU can be manually adjusted by either tightening or loosening the bands as appropriate.
There should be no numbness or whiteness in the limbs at all. Numbness may result in an inappropriate placing of the Air Bands where the bands may be pressuring against a nerve. Whiteness or an unnatural paleness in the limbs is due to occluding or cutting off the arterial flow - and this should be avoided at all times.
Recommended Base SKU for Arms on the KAATSU Master:
*10-20 SKU for older and middle age adults with less-than-average level of fitness
*20-30 SKU for older and middle age adults with an average level of fitness
*30-40 SKU for young and middle age adults with a good level of fitness
*40-50 SKU for teenagers, young adults and adults with a high level of fitness
*50+ SKU for elite athletes or those with extraordinarily high levels of fitness
Recommended Base SKU for Legs on the KAATSU Master:
*20-30 SKU for older and middle age adults with less-than-average level of fitness
*30-40 SKU for older and middle age adults with an average level of fitness
*40-50 SKU for teenagers, young adults and adults with a high level of fitness
*50-60 SKU for elite athletes or those with extraordinarily high levels of fitness
Recommended Base SKU for Arms on the KAATSU Nano:
*Less than 10 SKU for older and middle age adults with less-than-average level of fitness
*10-15 SKU for older and middle age adults with an average level of fitness
*15-20 SKU for young and middle age adults with a good level of fitness
*20-25 SKU for teenagers, young adults and adults with a high level of fitness
*25+ SKU for elite athletes or those with extraordinarily high levels of fitness
Recommended Base SKU for Legs on the KAATSU Nano:
*10-15 SKU for older and middle age adults with less-than-average level of fitness
*15-20 SKU for older and middle age adults with an average level of fitness
*20-25 SKU for teenagers, young adults and adults with a high level of fitness
*25-30 SKU for elite athletes or those with extraordinarily high levels of fitness
The recommended Base SKUs on the KAATSU Master and KAATSU Nano are different because the size of the compressors in each of these units.
A "KAATSU Color" should result when the appropriate Base SKU is applied. That is, a pinkness or rosiness in most individuals or a beefy redness for active adults or athletes will result in the palms of the hands or quadriceps on the legs.
LEVEL THREE:
After the Base SKU is applied by manually tightening the KAATSU Air Bands, the bands are gradually inflated to the Optimal SKU.
This process will take 5-10 minutes to do properly and may take 2-3 sessions to get precisely right.
On the arms, start inflating the bands to a level of 100 SKU. On the legs, start inflating the bands to a level of 150 SKU. Ask the user if (1) they are comfortable, (2) they feel any numbness, and (3) they can feel their pulsation under the bands while the KAATSU Specialist checks their Capillary Refill Time.
If the user is comfortable and without numbness, check their Capillary Refill by firmly pressing your thumb into the palm of their hands or their quadriceps muscle above their knee. Release and see how quickly the blanched (white) area returns to normal color. If this Capillary Refill Time is less than 3 seconds, this is safe. If this Capillary Refill Time is more than 3 seconds, then the Air Bands are inflated too tightly and should be immediately released.
The KAATSU Specialist asks the user if they can feel any pulsation under the bands. If the user cannot feel any pulsation, release the pressure and increase the SKU by 10 SKU for the arms and by 20 SKU for the legs.
At the increased SKU pressure (e.g., 110 SKU on the arms or 120 SKU on the legs), the KAATSU Specialist repeats this process and questioning: (1) Are you comfortable? (2) Do you feel any numbness? (3) Do you feel a pulsation under the bands?
The user may or may not feel any pulsation under the bands at low pressures. In that case, the KAATSU Specialist continues to increase the SKU pressure by increments of 10 SKU in the arms and 20 SKU in the legs.
This process continues until the user feels a strong pulsation under the bands. At the point where the pulsation begins to feel weaker, then the bands have been inflated too much. That is, if there is a strong sense of pulsation at 200 SKU, but there is a less strong sense of pulsation at 210 SKU, then the appropriate SKU pressure is 200 SKU.
To confirm that this initial Optimal SKU pressure is appropriate, do a series of KAATSU 3-point Exercises for both the arms and legs. The KAATSU 3-point Exercises for the arms involves 3 sets of hand clenches, bicep curls and tricep extensions. The KAATSU 3-point Exercises for the legs involves toe curls, toe raises, and heel raises (or for more fit individuals, heel raises, leg curls and squats).
During the 3 sets of these exercises, the KAATSU Specialist asks the user to do a set of 25-30 repetitions of each exercise (hand clenches, bicep curls and tricep extensions or heel raises, leg curls and squats).
If the user can do 3 sets of 25-30 repetitions of each exercise without going to failure, then the Optimal SKU pressure is too low. However, if the user can only do a decreasing amount of repetitions of each exercise before going to failure, then the Optimal SKU pressure is appropriate.
For example, if the user can only do 30 bicep curls on the first set, 22 repetitions on the second set, and only 15 repetitions on the third set before becoming fatigued, then the Base SKU and Optimal SKU pressures are appropriate.
Individuals of all ages and abilities will find that they will be able to accommodate, acclimate and adapt to increasing Optimal SKU pressures rather quickly between their first KAATSU and subsequent KAATSU sessions.
In summary, there are some important points to remember:
* The higher the Base SKU, the lower the Optimal SKU will be. It is the combination of the Base SKU and the Optimal SKU that is the critical pressure.
* There can and will be daily variations of up to +/- 20-30 SKU in the same individual.
* The anticipated Optimal Pressure is primarily a function of age, fitness and limb circumference.
Regarding age, the highest pressures generally occur between ages 20-30 and decrease for younger and older individuals. Dr Jim Stray-Gundersen, the Chief Medical Officer of KAATSU Global, explains, "There is an overlay of 'physiologic' age that modifies the chronological age. That is, with the elderly who may have stiff, damaged arteries, use relatively low pressures."
Regarding relative fitness, the fitter the subject is, the higher the optimal pressure from the same base pressure will be.
Regarding limb circumference/cross sectional area, the bigger the extremity is, the higher the pressure will be. So arm pressures are typically 50-100 SKUs lower than leg pressures. Also, if an individual has the more muscle versus fat in the extremity, they will generally be able to handle higher pressures.
As Dr Stray-Gundersen recommends, "Keep in mind what one is trying to do with KAATSU is find the optimal amount of venous outflow impediment so that otherwise easy exercises become unsustainable."
Copyright © 2015 by KAATSU Global
Monday, August 17, 2015
What Are The Differences Between KAATSU And BFR?
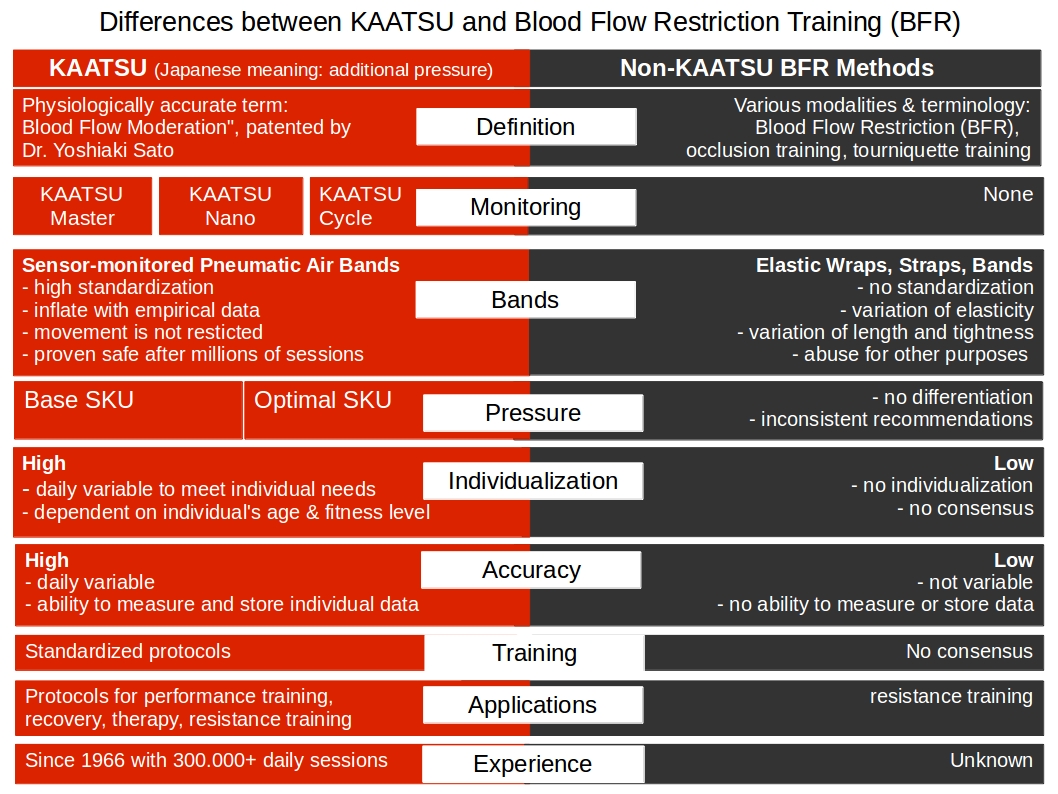
Many people ask about the differences between KAATSU and occlusion (tourniquet) training or BFR (Blood Flow Restriction) training.
Robert Heiduk, a sports scientist at the University of Bonn, Germany summarized differences between KAATSU and BFR in the chart above.
The first certified KAATSU Specialist in Germany, Heiduk will present his findings and recommendations of KAATSU training and about KAATSU equipment (including the KAATSU Master, KAATSU Nano, KAATSU Cycle and KAATSU Air Bands) at the strength and conditioning conference, Athletik-Konferenz on September 5th-6th 2015.
Heiduk's presentation will serve as the official KAATSU premiere in Germany.
He will also host a 90-minute pre-conference KAATSU introduction workshop on Friday, September 4th at the University in Bonn. Strength and Conditioning specialists, physios and speakers will also participate.
For more information, contact robert@eisenklinik.de and visit www.athletikkonferenz.de/.
Copyright © 2014 - 2015 by KAATSU Global
What Differs Between KAATSU And Traditional Strength Training?

Many people ask about the differences between KAATSU and traditional strength training.
Robert Heiduk, a sports scientist at the University of Bonn, Germany summarized the main physiological differences in the chart above.
The first certified KAATSU Specialist in Germany, Heiduk will present his findings and recommendations of KAATSU training and about KAATSU equipment (including the KAATSU Master, KAATSU Nano, KAATSU Cycle and KAATSU Air Bands) at the strength and conditioning conference, Athletik-Konferenz on September 5th-6th 2015.
Heiduk's presentation will serve as the official KAATSU premiere in Germany.
He will also host a 90-minute pre-conference KAATSU introduction workshop on Friday, September 4th at the University in Bonn. Strength and Conditioning specialists, physios and speakers will also participate.
For more information, contact robert@eisenklinik.de and visit www.athletikkonferenz.de/.
Copyright © 2014 - 2015 by KAATSU Global
Monday, August 10, 2015
Firming Up Legs With KAATSU
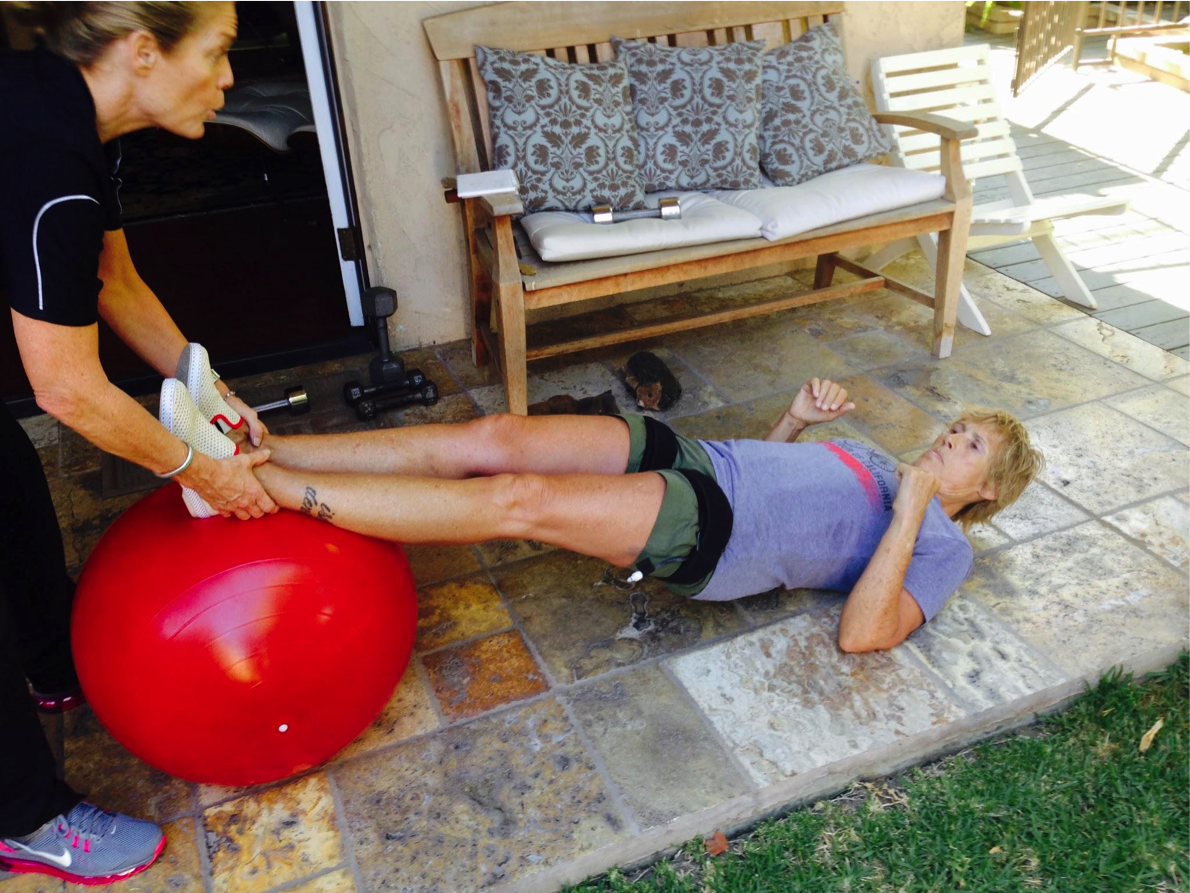


Whether KAATSU female users are 26 or 66*, many of them ask how best to tone their legs and hips with KAATSU.
In contrast to the more intense KAATSU workouts that focus on muscle hypertrophy or improvement of specific sports movements, KAATSU Walking with a lower pressure in the KAATSU Air Bands is highly recommended.
Preparation
*Be well-hydrated.
*Understand the standard KAATSU protocols (i.e., always have good capillary refill within 2-3 seconds, no occlusion, no numbness).
*Always warm-up with the KAATSU Cycle (i.e., 8 cycles of 20 seconds pressure on + 5 seconds pressure off).
Key Points
*Can do KAATSU Walking daily, but it is recommended to do at least 2-3 times per week.
*Use a lower-than-normal Base SKU and a lower-than-normal Optimal SKU.
*The entire leg-focused workout can be 15 minutes in total.
*Do not release the air in the KAATSU Air Bands throughout the entire workout (unless, of course, you feel numbness or become lightheaded).
Protocols
*STEP 1: Start with the KAATSU Cycle at a lower-than-normal Base SKU and a lower-than-normal Optimal SKU to warm-up (e.g., if your Optimal SKU is normally 200 SKU, then use an Optimal SKU of 160).
*STEP 2: After the KAATSU Cycle is complete (you can do this once or twice), inflate the KAATSU Air Bands to a lower-than-normal Optimal SKU (e.g., if your Optimal SKU is normally 200 SKU, then use an Optimal SKU of 160).
*STEP 3: Walk for 15-20 minutes. Simply walk around your neighborhood, your fitness gym or wherever you are doing KAATSU. Alternatively, you can walk on a treadmill or use a StairMaster or other such indoor equipment.
*STEP 4: Top off your KAATSU session with some light stretching and do a KAATSU Cycle as a warm-down if you wish.
Post-Workout Results
*You will feel very toned and refreshed.
*Your legs will become slimmed and toned without muscle hypertrophy.
* Photos show 66-year-old Diana Nyad doing some more intense and complicated KAATSU leg strengthening exercises with KAATSU Specialist Hollie Stray-Gundersen.
Copyright © 2015 by KAATSU Global
Thursday, August 6, 2015
Barry Heyden, Intensely KAATSU'ing

 A visit with trainer Barry Heyden is an outstanding trainer who has worked with many elite, Olympic and professional athletes. His training studios has all kinds of equipment from AlterG equipment to KAATSU Nanos and KAATSU Air Bands.
Heyden and his athletes in New York City showcased myriad different possible uses for KAATSU equipment at a recent workout session with a baseball player and a basketball player.
Heyden uses his KAATSU Nano and KAATSU Air Bands in the following manner:
Warm-up: He goes through 1-3 KAATSU Cycles where he warms up for an intense workout. His KAATSU Cycles usually increase in SKU from Set #1 to Set #3 (e.g., 150 SKU to 200 SKU to 250 SKU)
3-point Exercises: After he sets his Base SKU to a very high level of 50-55 SKU, he checks his capillary refill and does the 3-point exercises (i.e., hand clenches, bicep curls and tricep extensions) in slow, deliberate, non-lock (partial extension) movements at an Optimal SKU level of 200 SKU. He never rests more than 20 seconds between each set and each exercise, strictly adhering to standard KAATSU protocols.
Basic Exercises: After reaching failure on each of his 3-point exercises, he moves to basic exercises on his push-up bars. His compression levels (55 SKU for Base + 200 SKU for Optimal) are ideal for him as his repetition failures are ideal (e.g., 21-25 reps to failure on first set, 12-16 reps to failure on second set, and 7-10 reps to failure on third set).
Performance Training: Nearly the end of his KAATSU workout, Heyden focuses on specific performance training (e.g., baseball bat swings) where the intensity of his focus is evident. He ends each set when he reaches either technical failure (where proper technique is no longer possible) or muscular failure (where he becomes incapable of moving his muscles). In all of his sets and in most KAATSU Performance Training, technical failure was reached much sooner than muscular failure.
AlterG: Combining his leg KAATSU Air Bands on while doing all kinds of sets on the AlterG running machine is also a great way to top off his KAATSU session.
Alternatively or additionally, he can do a variety of leg exercises with his leg KAATSU Air Bands on from squats to leg extensions.
Warm-down/Recovery: He does 1-2 KAATSU Cycles with lower pressure to help with his recovery for the next workout.
For more information on Heyden who has worked with the Pittsburgh Pirates, Texas Rangers, and the New York Mets., visit here.
Copyright © 2015 by KAATSU Global
Tuesday, August 4, 2015
Doing KAATSU In An Airplane At 30,000 Feet
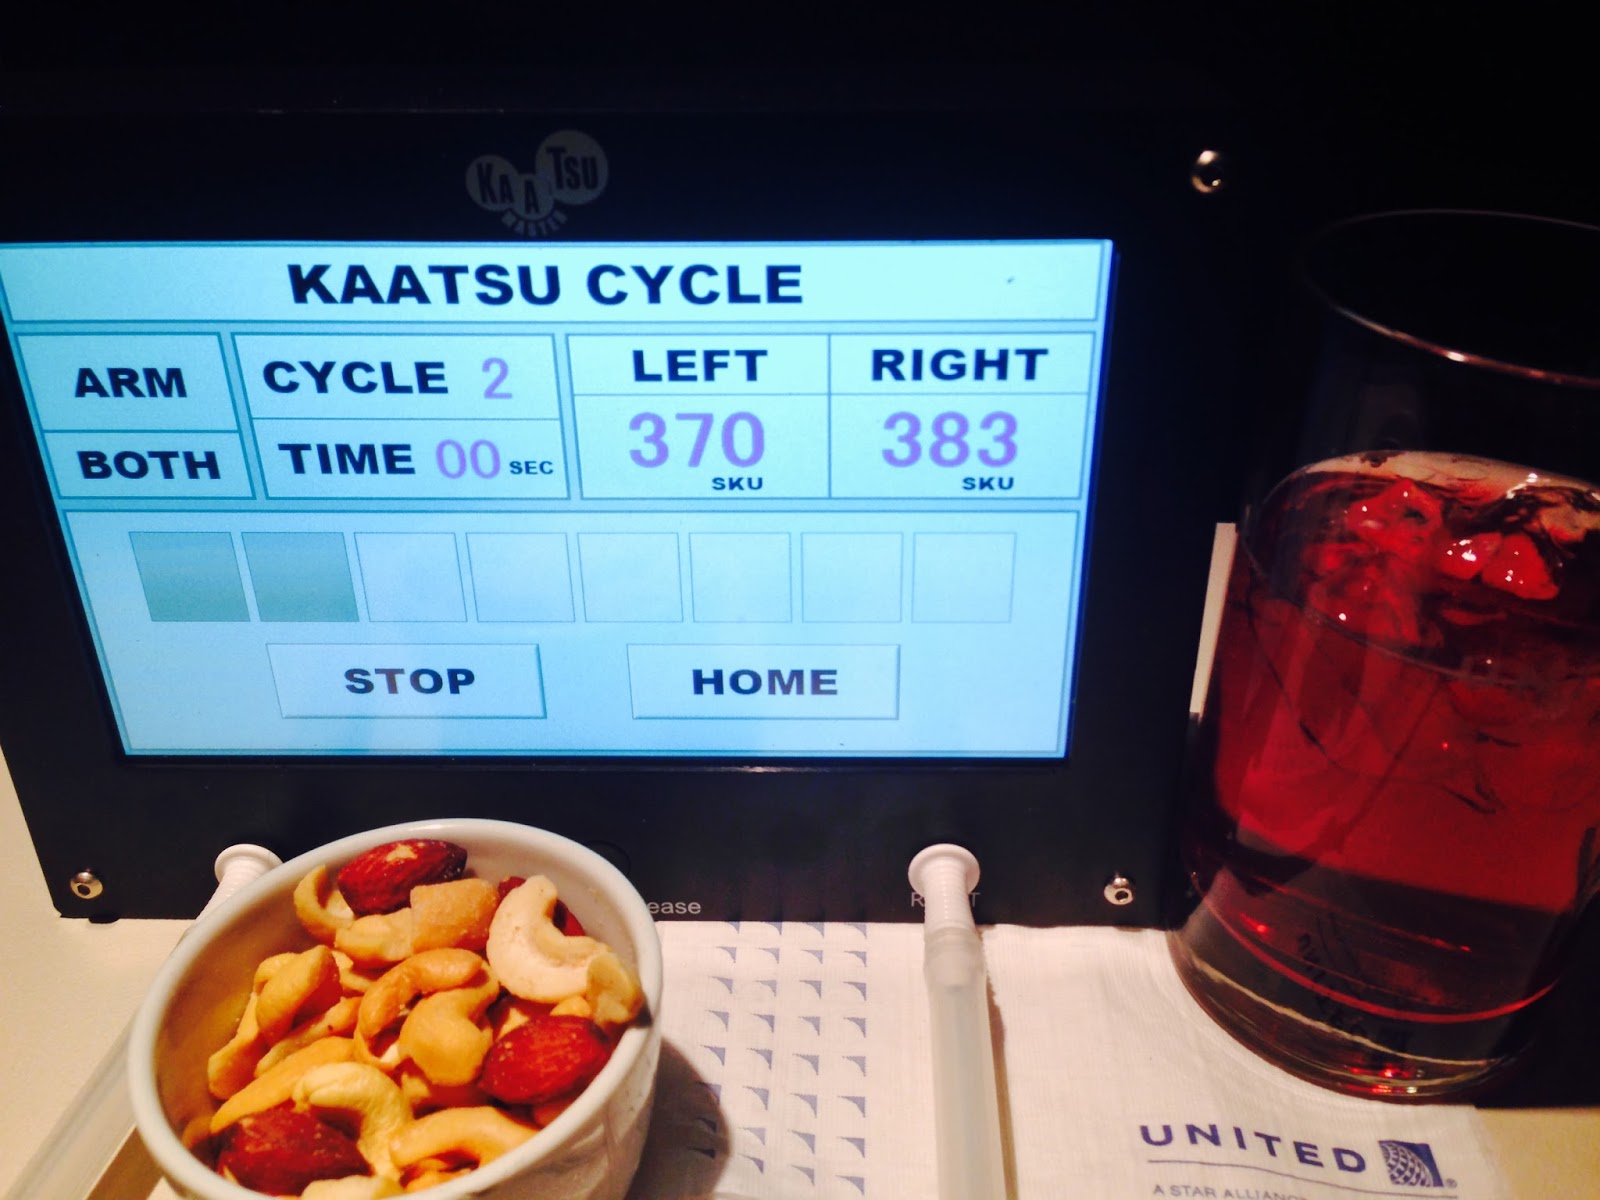
We regularly do KAATSU on every airplane that we board, whether it is a short flight between Los Angeles to San Francisco or a long intercontinental flight between Europe and Asia.
Doing KAATSU Cycles - not the KAATSU Constant mode - is ideal in any seat whether in economy class or business class, aisle seat or middle seat.
Typically, we pull out our KAATSU Master or KAATSU Nano unit and attach our KAATSU Air Bands at our typical Base SKU (between 40-50 SKU on the KAATSU Master and 25-30 on the KAATSU Nano) as soon as the pilot has leveled off the airplane. Occasionally, there is a stare or question from the person sitting next to us, but most people are busy sleeping, reading or watching movies and we are left to do KAATSU without interruption.
As soon as we check the Base SKU on both KAATSU Air Bands, we begin with our first KAATSU Cycle at a relatively low setting (e.g., 100 SKU). We do this whether or not it is an early morning or a red-eye flight. But we always make sure to hydrate well, at least one water bottle or juice within 30 minutes of starting the KAATSU Cycle.
After the first KAATSU Cycle is completed within 4 minutes, we start our second KAATSU Cycle at a higher pressure (e.g., 150 SKU). We are usually typing away on our laptop or slowly opening and closing our hands (i.e., hand clenches). By the middle of the second KAATSU Cycle, we are starting to feel some significant exertion in our forearms.
We continue with a third KAATSU Cycle at a higher pressure (e.g., 200 SKU) while doing isometric exercises like firmly pressing the palms of our hands together or pressing our hands downwards against our thighs.
We usually finish off with fourth or fifth set at the highest pressure that we can withstand (e.g., 250 SKU) as we continue to do hand clenches or various isometric exercises. By the third, fourth or fifth KAATSU Cycle, we are starting to feel an increased body temperature, but there is usually no increase in our heart rate (checked by our iPhone). Our muscles have definitely gone into fatigue just like we feel in a resistance workout.
As soon as we take off the KAATSU Air Bands, we feel relief and that good feeling like we just worked out. During early morning flights, it is a great way to wake up. During red-eye or intercontinental flights, it is a good way to prepare for a meal or take a nap.
It is much more difficult in an economy class seat to put on the KAATSU Air Bands on our legs, but it can be done with a little bit of effort. With the leg bands on, we flex our feet, press our legs upwards against the seat in front of us, or do a variety of isometric exercises (e.g., pressing our legs against our hands or downwards against the seat or simply flexing and relaxing our glutes).
Of course, you can always put the leg bands on and then walk over to the galley in an intercontinental flight and do a series of squats or leg stretches if you are really serious. Doing KAATSU in the galley usually leads to interesting conversations with the flight attendants.
In summary, KAATSU Cycle is a great way to get in a short and effective workout while at 30,000 feet in the air.
KAATSU Cycle In An Airplane Key Points:
1. Hydrate well before starting.
2. Apply KAATSU Air Bands on arms first.
3. Manually apply the usual Base SKU (pressure).
4. Start off conservatively with a low Optimal SKU (pressure) in the KAATSU Cycle. ALWAYS do KAATSU Cycle first as a warm-up.
5. Repeat the KAATSU Cycle 2-4 times.
6. Do simple exercises like hand clenches or isometric movements as desired for a 10-15 minute upper body workout.
7. Switch to leg bands if desired.
8. Start off conservatively with a low Optimal SKU (pressure) in the KAATSU Cycle. ALWAYS do KAATSU Cycle first as a warm-up.
9. Do simple exercises like flexing your feet or isometric movements within your chair. Repeat 2-4 times as desired for a great lower body workout.
10. All the standard KAATSU protocols apply: maintain good capillary refill time (within 2-3 seconds) and always feel a sense of pulsation under KAATSU Air Bands.
11. NEVER fall asleep with the KAATSU Air Bands on.
12. NEVER apply the KAATSU Air Bands so tightly that your hands or feet go/feel numb or your skin becomes white, gray or blue. In these cases, release the KAATSU Air Bands immediately.
13. NEVER do the KAATSU Constant mode.
Copyright © 2014 - 2015 by KAATSU Global
Subscribe to:
Posts (Atom)